เริ่มต้นเขียน unit test กับ JavaScript AngularJS ตอนที่ 4 unit test directive

ตอนที่ผ่านมา ของ unit test AngularJS เราได้เขียน unit test ของ controller แล้ว มาวันนี้เราจะได้มาลองเขียน AngularJS Directive unit test กันครับ
ผมคิดว่าการสร้าง unit test Angular directive ค่อนข้างมีความซับซ้อนมากกว่า test controller และ service ดังนั้น ค่อยๆ ทำความเข้าใจไปด้วยกันนะครับ
ขั้นตอนต่างๆ เป็นดังนี้
- สร้าง Angular directive สำหรับ subscribe ด้วย email
- เขียน unit test ทดสอบ Angular directive
- run unit test เพื่อตรวจสอบผลลัพธ์การทำงาน
#สร้าง Angular directive สำหรับ subscribe ด้วย email ให้เราสร้าง JavaScript file ใหม่ใน folder src ตั้งชื่อว่า emailSubscriptionDirective.js แล้วแก้ไข file เป็นดังนี้
src/emailSubscriptionDirective.js
var app = angular.module('emailSubscriptionTestApp', []);

app.directive('emailSubscription', function () {

    var emailSuscriptionDirective = {
        restrict: 'E',
        scope: {
            email: "="
        },

        controller: function ($scope) {
            $scope.hasSubscribed = false;

            $scope.subscribe = function () {
                $scope.hasSubscribed = true;
                console.log("Thank you for subscribing, we will send email to " + $scope.email);
            };
        },

        template: '<input id="txtEmail" type="text" ng-model="email" /> ' +
        '<input id="btnSubscribe" type="button" ng-click="subscribe()" />'
    };

    return emailSuscriptionDirective;
});
อธิบายคำสั่ง
- เราสร้าง directive ที่เป็น email subscription สำหรับให้ผู้ใช้กรอก email เพื่อรับข่าวสารจาก web site
- app.directive('emailSubscription', function () { } เพื่อสร้าง directive ใหม่ใน module หลัก
- เราตั้งชื่อ directive นี้ว่า emailSubscription
- เราสร้าง directive ด้วยการกำหนดค่า config ต่างๆ ในลักษณะ JSON
- restrict: 'E' เพื่อบอกว่า directive นี้ให้ใช้ในรูปแบบ HTML element เท่านั้นเวลาที่ใช้งาน เราก็เขียน แบบนี้ email-subscription ไว้ใน HTML file ครับ
- scope: { email: "=" } directive นี้จะใช้ isolated scope มี scope แยกออกมาใช้งานส่วนตัวภายใน directive และมีการกำหนด property email เพื่อรับค่าจากภายนอก ผ่าน email attribute ของ directive
- controller มีการประกาศ controller ไว้ใช้สำหรับจดการจัดกาาร การ subscribe ด้วย email ของ user
- $scope.hasSubscribed เป็น property สำหรับเก็บค่าว่าผู้ใช้ได้ subscribe ด้วย email ไปแล้วหรือไม่
- $scope.subscribe = function (){} เป็น method ที่ถูกเรียกใช้เมื่อผู้ใช้ทำการกรอก email และกดปุ่ม subscribe โดย assign ค่า $scope.hasSubscribed เป็น true และ log ข้อความออกมาที่ console
- เราได้กำหนด template ให้กับ directive นี้โดยการกำหนดค่า string HTML ลงไปที่ template config โดยมี text box รับค่าเข้าเก็บไว้ใน $scope.email และ button ที่เรียกใช้งาน $scope.subscribe = function (){} เมื่อมีการ click ปุ่ม
เขียน unit test ทดสอบ Angular directive
ให้เราสร้าง JavaScript file ใหม่ใน folder spec ตั้งชื่อว่า emailSubscriptionDirectiveSpec.js แล้วแก้ไข file เป็นดังนี้
spec/emailSubscriptionDirectiveSpec.js
describe("myDirective", function () {

    it('user click subscribe, then scope.hasSubscribed changed to true', function () {

        var el = null;
        var scope = null;

        angular.mock.module('emailSubscriptionTestApp');
        angular.mock.inject(function ($compile, $rootScope) {

            $rootScope.email = null;
            var htmlElement = angular.element('<email-subscription email="email"></email-subscription>');
            el = $compile(htmlElement)($rootScope);
            $rootScope.$digest();

            scope = el.isolateScope();
        });

        var emailTextInput = el.find("#txtEmail");
        emailTextInput.val("[email protected]");
        emailTextInput.trigger('input');

        var button = el.find("#btnSubscribe");
        button.trigger("click");
        expect(scope.hasSubscribed).toBe(true);
    });

});
อธิบายคำสั่ง
- ใน unit test function นี้เราจะเขียนคำสั่งเพื่อทดสอบการว่า หลังจากที่ผู้ใช้ได้ทำการกรอก email ใน text box แล้ว click ปุ่ม subscribe ค่าของ scope.hasSubscribed เปลี่ยนเป็น true
- การสร้าง directive สำหรับ unit test แตกต่างจาก service หรือ controller เนื่องจาก โดยทั่วไป directive จะมีส่วนของ UI ที่เป็น HTML เข้ามาด้วย ดังนั้นจึงต้องการ compile และ evaluate expression ต่างๆ ให้ directive ใช้งานได้ สำหรับการไปใช้งานใน function เราแทบไม่ต้องเข้ามาใช้งานส่วนนี้โดยตรง แต่เพราะ framework จะทำให้ แต่สำหรับ unit test เราต้องทำส่วนนี้เองครับ
- angular.mock.module('emailSubscriptionTestApp'); โหลด module ที่มี directive ของเราอยู่ เช่นเดียวกับการ unit test service และ controller
- angular.mock.inject(function ($compile, $rootScope) { } inject $compile และ $rootScope เพื่อสร้าง directive
- $rootScope.email = null; เนื่องจาก directive มีการรับค่า email จากภายนอก เราจึงกำหนดค่านี้ไว้ที่ $rootScope
- ใช้ $compile(htmlElement)($rootScope) รับค่า html element ของ directive และ $rootScope เพื่อสร้าง directive object
- ใช้ $rootScope.$digest(); เพื่อ evaluate พวก expression ใน directive template
- el.isolateScope(); เพื่ออ้างอิงถึง isolated scope ของ directive ไว้สำหรับเข้าถึงค่า property email หรือ hasSubscribed ได้
- เราใช้ jQuery trigger เพื่อจำลองการกรอกข้อมูล email และการกดปุ่มของผู้ใช้
- expect(scope.hasSubscribed).toBe(true); ทดสอบว่า hasSubscribed หากมีค่า true ผลการทำสอบของ test นี้ก็จะทำงานได้ถูกต้อง คือ test pass นั่นเอง
!!! อย่าลืมเพิ่ม jQuery เข้าไปใน karma config file ก่อน run test
- จากคำสั่งที่ผ่านมาจะเห็นว่าเราได้ใช้งาน jQuery selector el.find("#id")
- การใช้ jQuery selector เช่นนี้จำเป็นที่เราต้องเพิ่ม jQuery เข้าไปใน project ด้วย
- ถ้ายังไม่มี jQuery ก็ให้ไปโหลดมาเก็บไว้ใน project ด้วยนะครับ
- การเพิ่มทำได้โดยการแก้ไข kamar.conf.js ส่วน files ให้มี jQuery ด้วย
แก้ไข kamar.conf.js เป็นดังนี้ kamar.conf.js
module.exports = function(config) {
  config.set({

    // base path that will be used to resolve all patterns (eg. files, exclude)
    basePath: '',

    // frameworks to use
    // available frameworks: https://npmjs.org/browse/keyword/karma-adapter
    frameworks: ['jasmine'],


    // list of files / patterns to load in the browser
    files: [
      'lib/jquery-2.2.0.min.js',
      'lib/angular-1.5.0/angular.min.js',
      'lib/angular-1.5.0/angular-mocks.js',
      'src/**/*.js',
      'spec/**/*.js'
    ],


    // list of files to exclude
    exclude: [
    ],


    // preprocess matching files before serving them to the browser
    // available preprocessors: https://npmjs.org/browse/keyword/karma-preprocessor
    preprocessors: {
    },


    // test results reporter to use
    // possible values: 'dots', 'progress'
    // available reporters: https://npmjs.org/browse/keyword/karma-reporter
    reporters: ['progress'],


    // web server port
    port: 9876,


    // enable / disable colors in the output (reporters and logs)
    colors: true,


    // level of logging
    // possible values: config.LOG_DISABLE || config.LOG_ERROR || config.LOG_WARN || config.LOG_INFO || config.LOG_DEBUG
    logLevel: config.LOG_INFO,


    // enable / disable watching file and executing tests whenever any file changes
    autoWatch: true,


    // start these browsers
    // available browser launchers: https://npmjs.org/browse/keyword/karma-launcher
    browsers: ['PhantomJS'],


    // Continuous Integration mode
    // if true, Karma captures browsers, runs the tests and exits
    singleRun: false,

    // Concurrency level
    // how many browser should be started simultaneous
    concurrency: Infinity
  })
};
run unit test เพื่อตรวจสอบผลลัพธ์การทำงาน
ไปที่ root ของ project เปิด Windows command line หรือ terminal แล้วพิมพ์คำสั่งต่อไปนี้ เพื่อทดสอบการทำงานของ unit test
npm test
ผลลัพลัพธ์ที่หน้าจอ command line
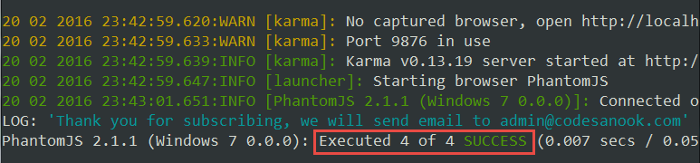
- test case ที่เราทดสอบทำงานได้ถูกต้อง
- 4 of 4 เนื่องจากมีการ run test case อื่นๆ จากบทความที่ผ่านมาด้วย
แถมให้อีกหน่อย
คำสั่งเพื่อทดสอบว่า email ที่เรากรอกไปถูก set ค่าถูกต้องหรือไม่ เราเพิ่ม test case เข้าไปใน describe callback function ได้เลยครับ
it('user click subscribe, scope email set correctly', function () {

        var el = null;
        var scope = null;

        angular.mock.module('emailSubscriptionTestApp');
        angular.mock.inject(function ($compile, $rootScope) {

            $rootScope.email = null;
            var htmlElement = angular.element('<email-subscription email="email"></email-subscription>');
            el = $compile(htmlElement)($rootScope);
            $rootScope.$digest();

            scope = el.isolateScope();
        });

        var emailTextInput = el.find("#txtEmail");
        var email = "[email protected]";
        emailTextInput.val(email);
        emailTextInput.trigger('input');

        var button = el.find("#btnSubscribe");
        button.trigger("click");
        expect(scope.email).toBe(email);
    });
ผลลัพธ์การทำงาน

ส่งท้าย
หลังจากได้เรียนรู้การเขียน unit test สำหรับ directive ผมหวังว่าผู้อ่านจะได้แนวคิดการใช้งาน และสามารถนำไปประยุกต์ต่อได้ การเขียน unit test directive ค่อนข้างมีความซับซ้อนมากกว่า service และ controller แต่เราก็ไม่อยากจะปล่อยผ่านไม่ test ส่วนนี้ เพราะเมื่อใดที่เราแก้ไข เราก็ไม่รู้เลยว่า function การทำงาน ยังทำถูกต้องอยู่อีกไหม และต้องมา manual test อีกรอบ
หลังจากได้อ่านกันแล้ว ใครมีคำถามข้อสงสัยใดๆ comment มาได้เลยนะครับ ขอให้ทุกคนสนุกกับการเขียน code, codesanook ขอบคุณครับ
download source code
เมื่อโหลดไปแล้วใช้คำสั่ง npm install package ต่างๆ ก็จะโหลดให้โดยอัตโนมัติครับ